Build your first app
Learn how to create a simple node.js application that interacts with Envoy.
This tutorial will cover how to build a simple app using Node.js that displays a custom greeting (Hello World) in the Envoy visitor log when a visitor signs in.
Overview
App development involves building and hosting your web app yourself and then registering your app with Envoy. Apps are registered using the Dev Dashboard.
Apps typically have a few commonalities:
- Setup steps
- Events they listen to for
- Some interaction back to Envoy
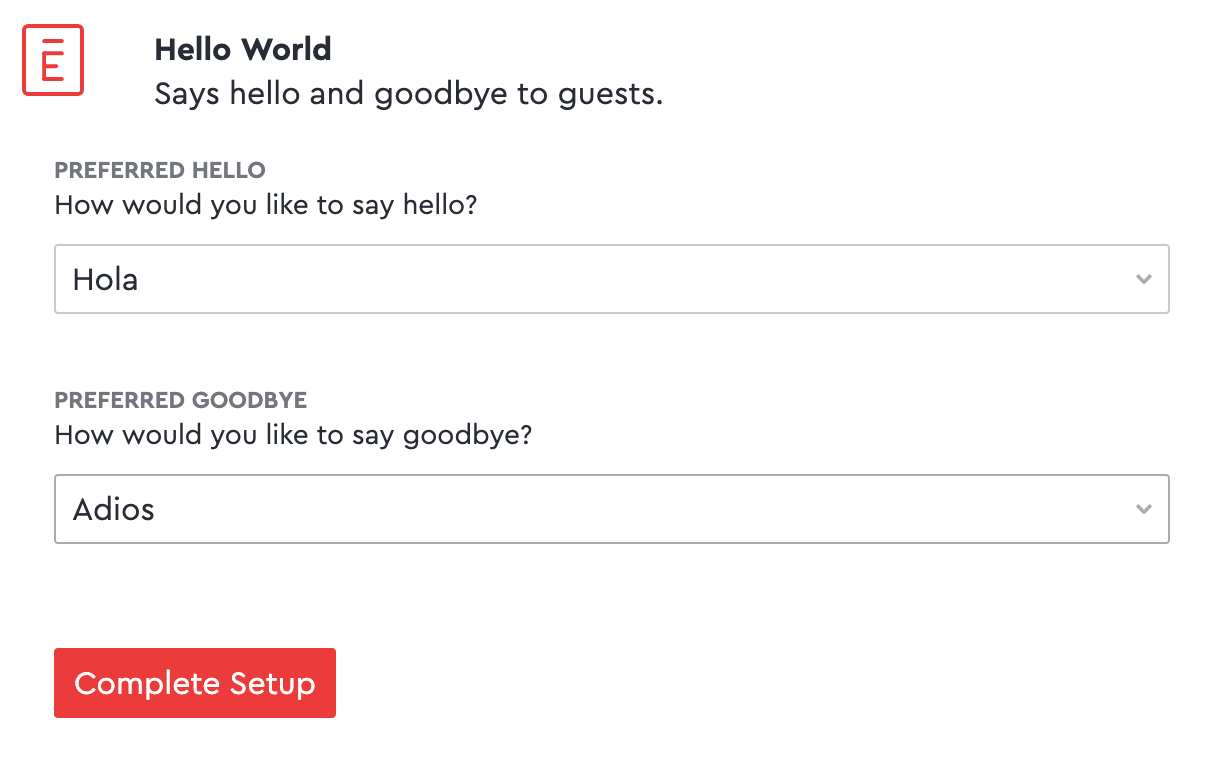
When our Hello World app is installed, we'd like the installer to be able to set their desired greetings and salutations. To do this, we'll need to render a dropdown with our greeting options, and allow them to pick one.
In order to greet our guests, we'll need to listen for the "visitor sign-in" and "visitor sign-out" events, and handle those appropriately.
On visitor sign-in, we'll create a personalized greeting for our visitor using the greeting selected during setup as well as the visitor's name.
On visitor sign out, we'll do the same, and as an added bonus, we'll add the duration of their visit to the message.
The personalized messages we've created won't be displayed to the user on the Visitor iPad but we could use this to send an email or SMS. For the purposes of this tutorial, we are going to show you how to use the attachment system to display those greetings in the Envoy dashboard for the receptionist.
Development
To build our app, we're going to create a Node.js application. Note that any language can be used as illustrated in our API reference, but currently only a Node.js SDK is available.
For this tutorial, you can use the latest node version and npm versions.
Setup
Start by creating a repository on GitHub and cloning it to your local machine. During GitHub repo setup, it's a good idea to select the option for GitHub to automatically include a README and a .gitignore file for Node.js.
git clone https://github.com/envoy/my-plugin.gitReplace https://github.com/envoy/my-plugin.git with the clonable URL to your repo.
In the app directory, initialize the Node app.
npm init --yesA package.json file should have been created. This file describes your application. In this file, add the following key to the JSON:
"engines": {
  "node": "22.x"
}
Also, we need to point to our start script that we'll create shortly. Replace the scripts portion of package.json with the following:
"scripts": {
  "start": "node index.js"
}
Later when we deploy to Heroku, this allows it to determine the deployment runtime and what command to run.
Next, if you didn't auto-generate a .gitignore file from GitHub, create one now with the following contents:
node_modules
.env
Now to install our dependencies. We're going to install Express.js and our Node SDK. Most integrations also talk to external APIs, so you'll often find yourself installing an HTTP request library as well, like axios, superagent, or request (none of these are necessary for this tutorial though).
Express.js
npm install --save expressEnvoy's Node.js SDK
npm install --save @envoy/envoy-integrations-sdkOnce the installation is complete, a package-lock.json file should have been created. This file locks down your installed dependencies to specific versions. Be sure to add this file to git.
Now create an index.js file. This is where we'll write our server script.
The code
In the index.js file, start by including the dependencies we installed.
const express = require('express');
const { middleware, errorMiddleware } = require('@envoy/envoy-integrations-sdk');
Next, initialize Express.js with our middleware.
const app = express();
app.use(middleware());
Setup Routes
Now we can use our app object to define our app's endpoints. Let's start with a route that sends back available options for the "preferred hello" dropdown that we saw in the overview screenshot.
app.post('/hello-options', (req, res) => {
  res.send([
    {
      label: 'Hello',
      value: 'Hello',
    },
    {
      label: 'Hola',
      value: 'Hola',
    },
    {
      label: 'Aloha',
      value: 'Aloha',
    },
  ]);
});
In the above, we're sending back a JSON array of objects where each object has a label and value. Typically these are not the same, but for our case, we'd like what is displayed on the front-end to also be the value we receive later.
Now do something similar for "goodbye".
app.post('/goodbye-options', (req, res) => {
  res.send([
    {
      label: 'Goodbye',
      value: 'Goodbye',
    },
    {
      label: 'Adios',
      value: 'Adios',
    },
    {
      label: 'Aloha',
      value: 'Aloha',
    },
  ]);
});
Event Handlers
Now we can create our "visitor sign-in" endpoint.
The URL of this endpoint can be anything - we'll connect the event with the endpoint URL in the Dev Dashboard menu - but here we're naming the endpoint after the event.
app.post('/visitor-sign-in', async (req, res) => {
  const envoy = req.envoy; // our middleware adds an "envoy" object to req.
  const job = envoy.job;
  const hello = envoy.meta.config.HELLO;
  const visitor = envoy.payload;
  const visitorName = visitor.attributes['full-name'];

  const message = `${hello} ${visitorName}!`; // our custom greeting
  await job.attach({ label: 'Hello', value: message }); // show in the Envoy dashboard.

  res.send({ hello });
});
job is our name for the event within the plugin.
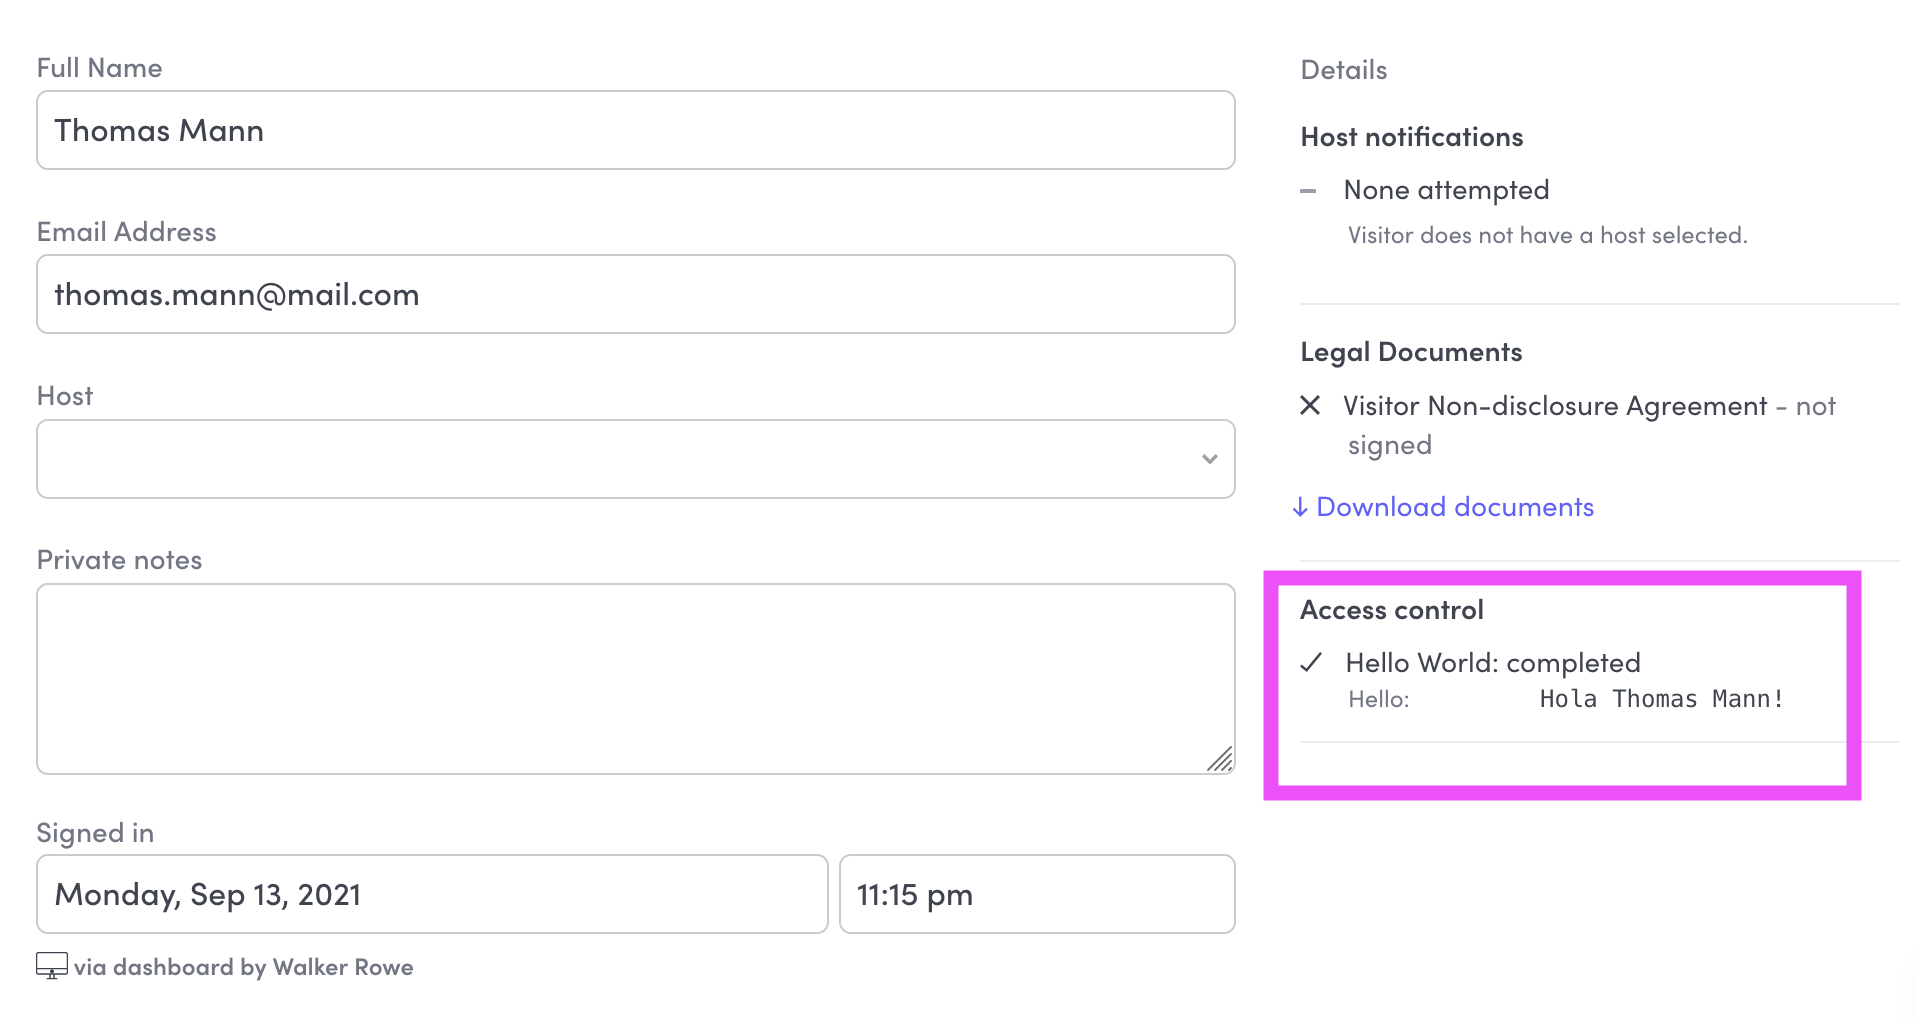
job.attach sends an API call to Envoy's servers and adds that data to the visitor-sign-in event. That's how the visitors page will know what greeting to display to the user.
Finally, we're sending back a 200 response. The data included in the response is optional - use it if it's useful for debugging.
Now for the "visitor sign-out" endpoint.
app.post('/visitor-sign-out', async (req, res) => {
  const envoy = req.envoy; // our middleware adds an "envoy" object to req.
  const job = envoy.job;
  const goodbye = envoy.meta.config.GOODBYE;
  const visitor = envoy.payload;
  const visitorName = visitor.attributes['full-name'];

  const message = `${goodbye} ${visitorName}!`;
  await job.attach({ label: 'Goodbye', value: message });

  res.send({ goodbye });
});
Debugging
If you want to see some output to test whether the connection is working or any error is thrown, one option is to use console.log to get the information you need. Here are some examples:
app.use(function (req, res, next) {
  console.log('Time:', Date.now())
  next()
})app.post('/goodbye-options', (req, res) => {
console.log('goodbye-options');
//...
})Another option is to set DEBUG in the command line and watch stdout:
set DEBUG=express:*Wrapping Up
Now that our setup and event endpoints are ready, we can finish our script by making sure we use our errorMiddleware and creating a server on a specific port.
app.use(errorMiddleware());

const listener = app.listen(process.env.PORT || 0, () => {
  console.log(`Listening on port ${listener.address().port}`);
});
Deploying your app
You can run your app in a variety of ways.
- Use ngrok to expose your app to the public internet, so that Envoy can find your app. That works even on an internal network, such as in your home or office.
- If you are using a cloud server, you could configure a web server in reverse proxy mode to do SSL termination and pass off the traffic to Express. That way you don't have to add certificates to your express code.
- You could use Heroku, which is like a container on the web where you an run apps in the cloud.
For the purposes of this tutorial, we will show you how to deploy your app on Heroku but you can use any of the methods above.
- Push up all your changes to Github.
- Log in to Heroku, click on Create New App.
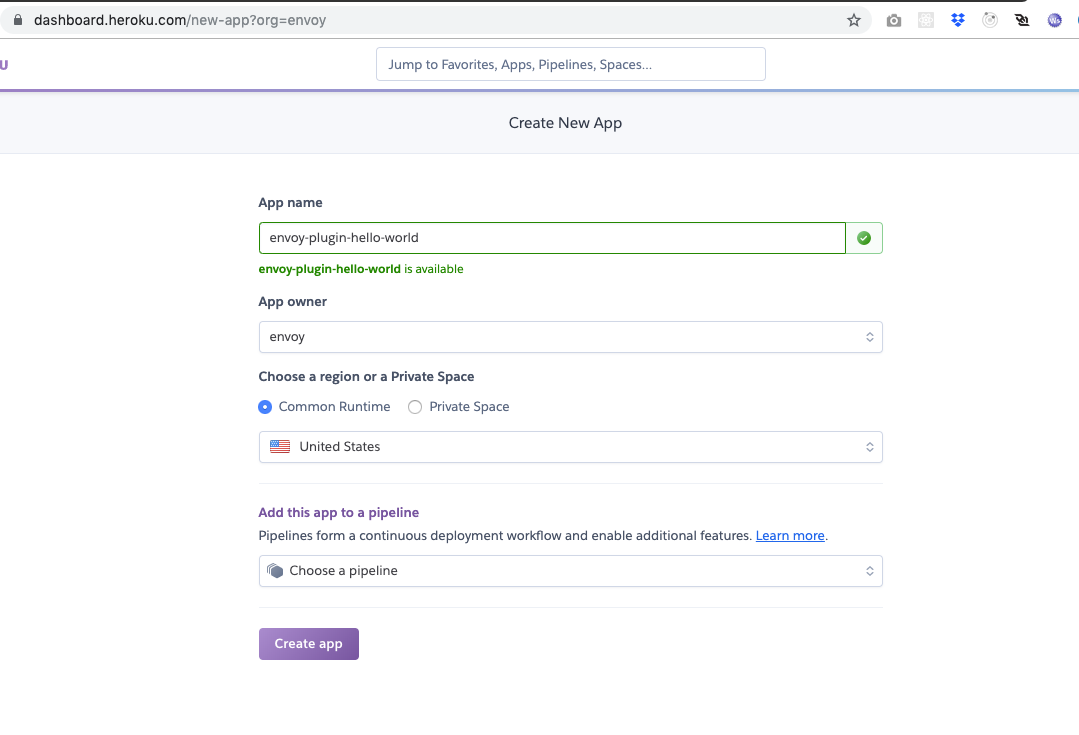
- After filling out the name, click Create app.
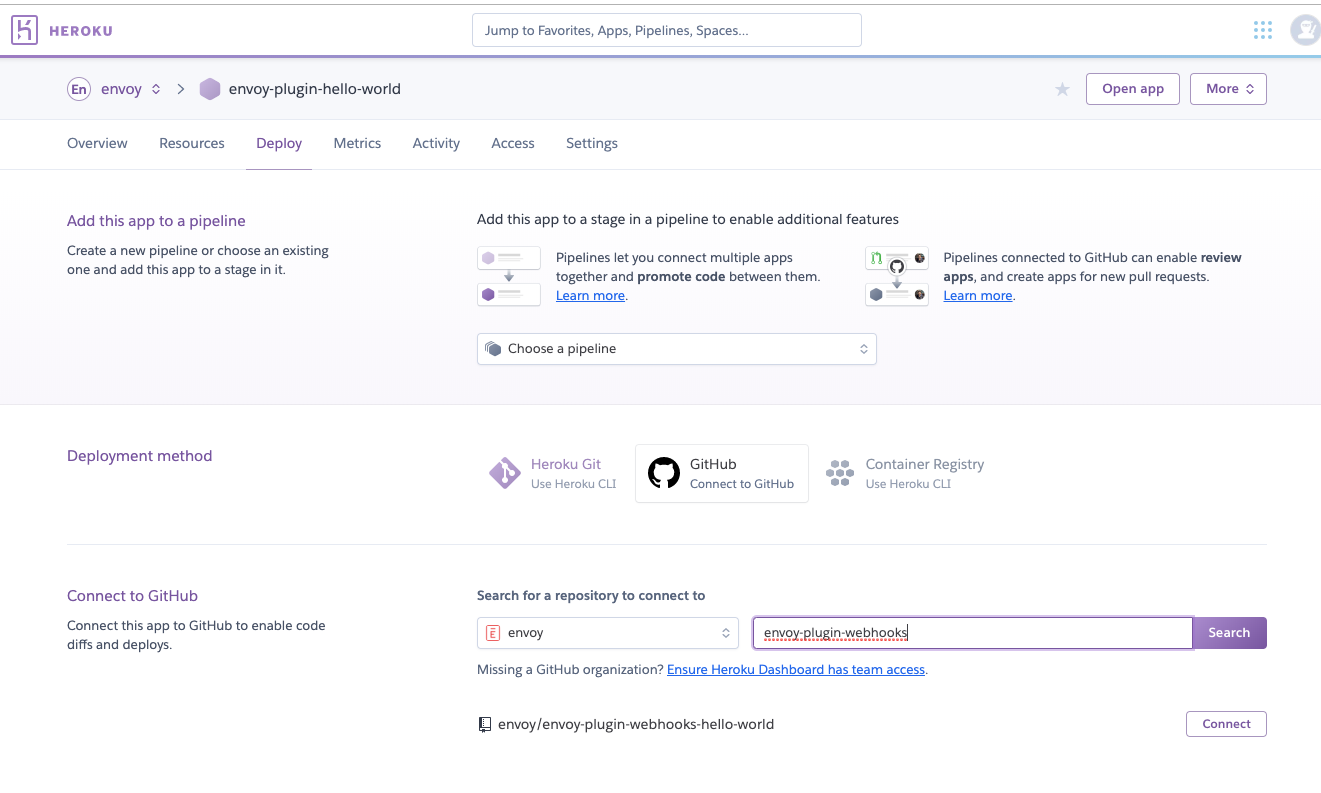
- Select GitHub as the deployment method, search for your repo, and click Connect.
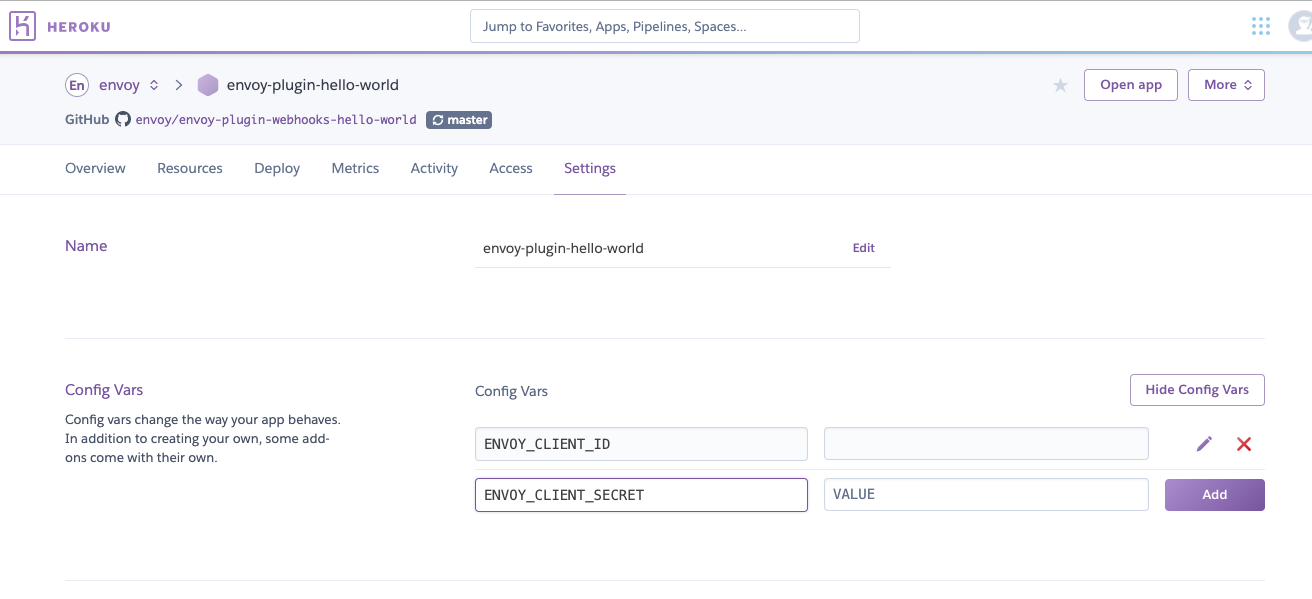
- Head to the Settings section and add placeholders for the
ENVOY_CLIENT_IDandENVOY_CLIENT_SECRETenvironment variables. The Node.js SDK uses these values to authenticate with Envoy.
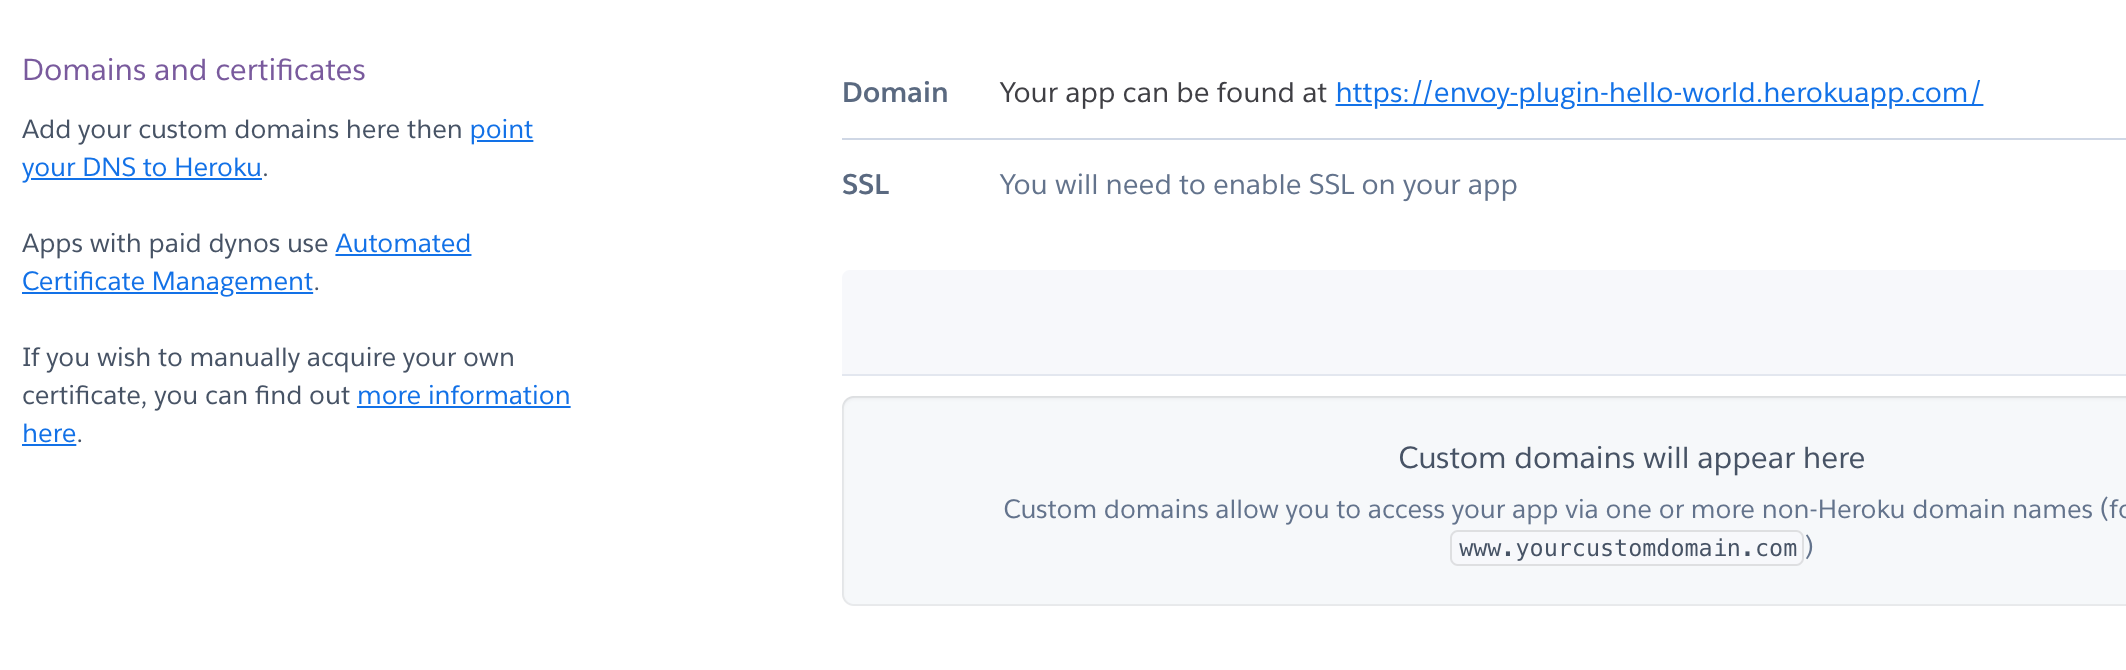
- Scroll to the "Domains and certificates" area, and copy your app's URL. In the example screenshot, it's https://envoy-plugin-hello-world.herokuapp.com.
Register your app in Envoy
Register for an Envoy account here
Now that our code is complete and deployed, we need to let Envoy know about our app. We do that with the Dev Dashboard.
You will find the Dev Dashboard on the Envoy Dashboard screen. NOTE: your dashboard might say "Integrations" instead of "Apps".

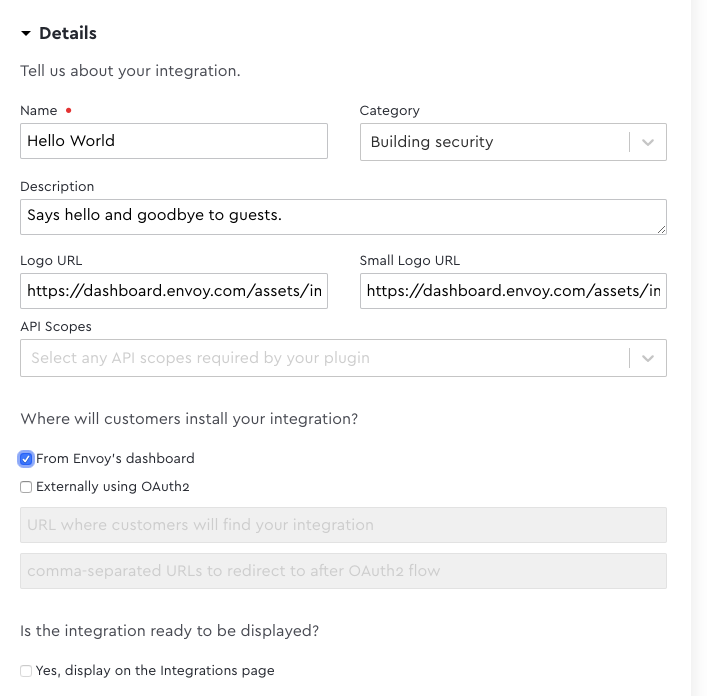
Details
- Fill in the basic details about the app.
- Select From Envoy's Dashboard to the question Where will customers install your integration?
- Include the following URL path for the the logo
https://dashboard.envoy.com/assets/images/logo-small-red.svg
Events
Here's where we define the URLs to each of our workers.
- Expand the Events dropdown.
- Input the callback URLs
- Click add a webhook to add new webhook URLs
| Endpoint | Event |
|---|---|
| https://my-heroku-url.com/visitor-sign-in | Visitor Sign In |
| https://my-heroku-url.com/visitor-sign-out | Visitor Sign Out |
For all the URL fields below, be sure to replace
https://my-heroku-url.com/with the URL you copied from Heroku. Leave the paths to each endpoint the same.

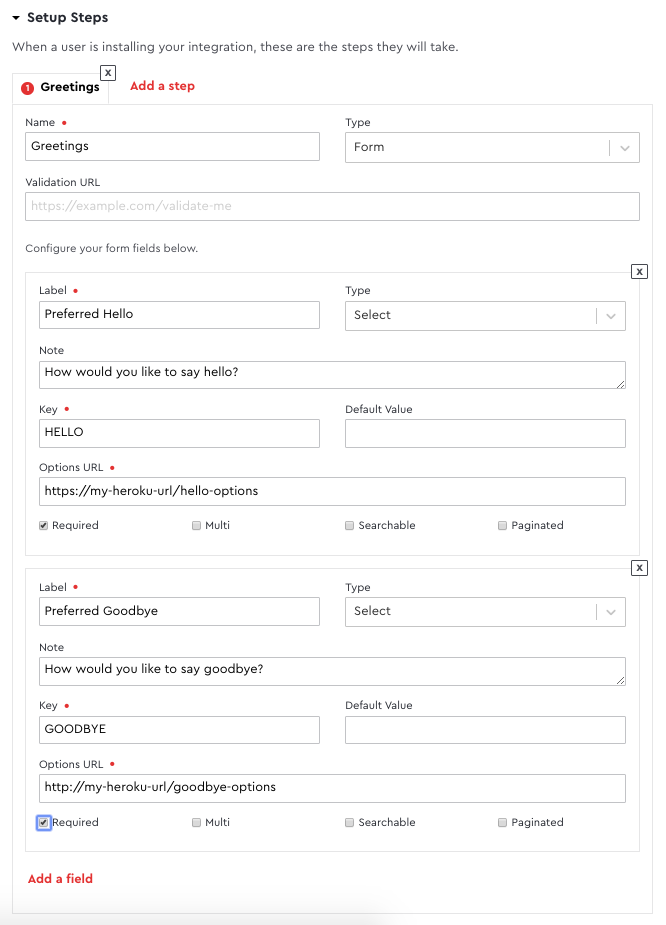
Setup Steps
- Create a single setup step that allows the installer to select their preferred greetings.
| Endpoint | Event |
|---|---|
| https://my-heroku-url.com/hello-options | Configure Welcome Message |
| https://my-heroku-url.com/goodbye-options | Configure Goodble Message |
-
Click Save Integration. After saving, your client credentials will be visible.
-
Go back to your placeholder Heroku environment variables that we created earlier and paste in the values for the client ID and secret.
You can now head to the Deploy section of Heroku and scroll to the bottom to manually deploy your app.

Now that your app has the appropriate values you'll need to allow your app to be installed in the Envoy dashboard.
- Go back to the Dev Dashboard
- Click configure on your hello world app to edit it.
- Select the Yes, display on the Integrations page box
- Click Save Integration.
This app is private to your account, which means it will only show up for users in your company. Learn how to make your app publicly available to other companies.
Testing your app
Now, to test your app, you'll need to configure the messages to send to the user when they visit.
- Find your hello world app on the integrations page and click install
This will install the integration at your current location, for all users at that location.
-
Select configure to edit your Hello World app settings.
-
Select the greeting to use from the drop-down and click complete setup to save your changes.
- Go to Visitors and click New Visitor.
- Create a visitor
- Go to the Visitor Log. You will see that the visitor has logged in.
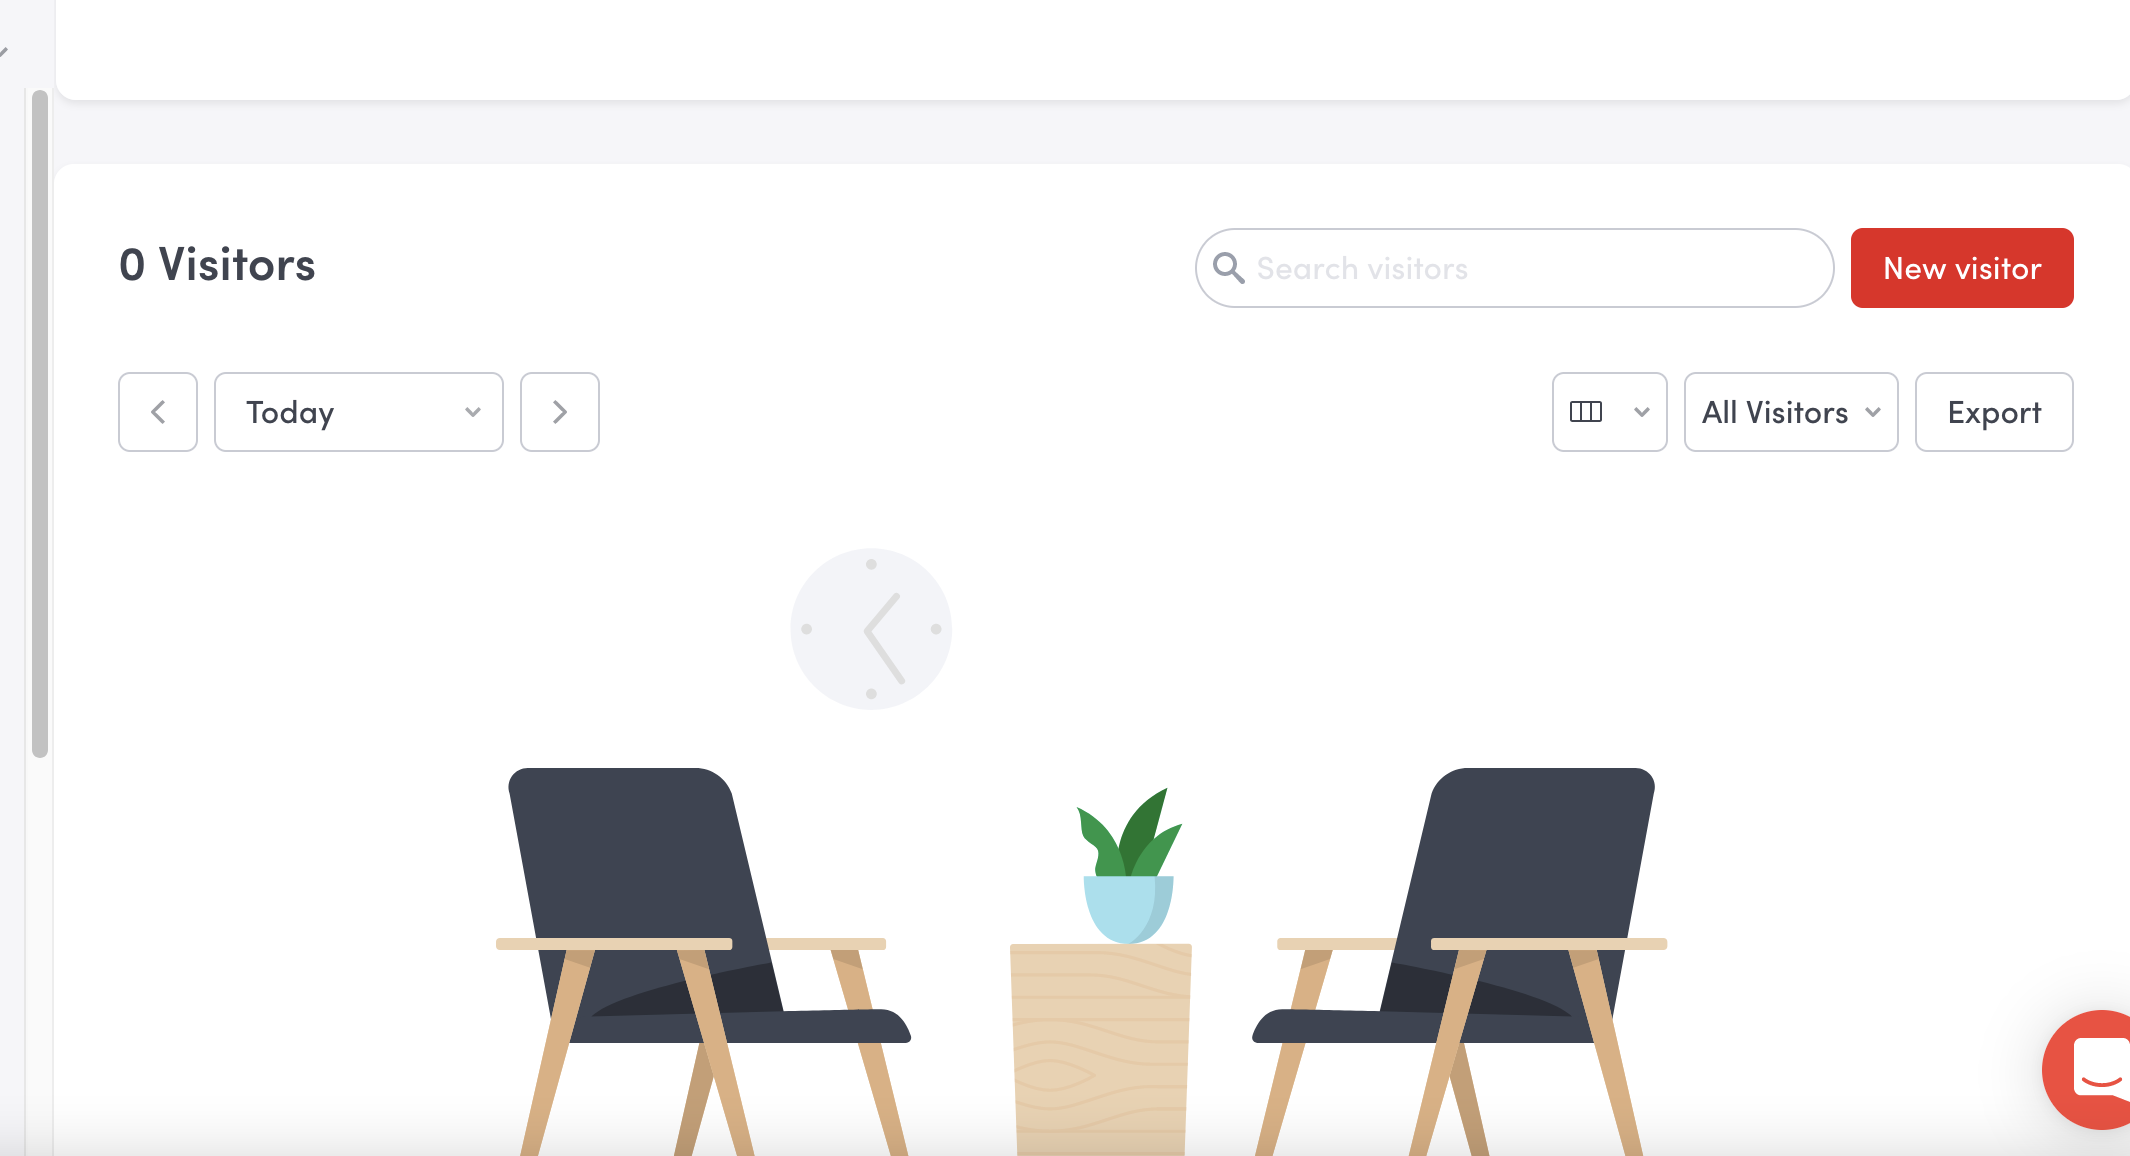
- Click on the visitor's name and you will see the welcome message.
- Sign out the visitor and you will see the Goodbye message in the visitor log.
Updated about 1 year ago